Thursday, December 29, 2016

"Black Cat" in Cape to Rio 2017

I was to be co-skipper of "Black Cat" for this race, the 2017 iteration of the wonderful Cape to Rio Race, linking two beautiful cities that are separated by the South Atlantic Ocean. "Black Cat" is the Didi 38 that I built in my garden for the 1996 race. That plan to co-skipper her, partnered by Dave "Wavy" Immelman, came off track when I wrenched my already-damaged left knee while racing my Paper Jet skiff in Maryland a couple of months ago. When I got off my boat I could hardly stand and subsequent visits to doctors, followed by X-Rays, MRI etc. came up with sheer tears in both menisci of the knee. Able to only hobble around, surgery was scheduled and I felt that I would be a liability and danger to boat, crew and myself for the race. Sadly, I had to withdraw from the crew and will miss this race that I so enjoy.

I will still be involved though. "Black Cat" has satellite telephones aboard and they will be used to send me daily reports from the boat, with news about life aboard, how the race is going and anything else that is happening. They will also send me photos and possibly video footage as well. I will use that as material for posts on this blog.
"Black Cat" crossing the finish line of the 2014 Governor's Cup ocean race from South Africa to St Helena Island. Skipper Dave "Wavy" Immelman standing at the helm.
The race starts on Sunday 1st January at 14h00 local time, 12h00 GMT. The slower boats have already started their race, on Boxing Day (26th December). These are IRC Division 3 monohulls and Division 2 multihulls. Progress of the race can be followed via live tracking on XTra-Trak. This link works in Internet Explorer but doesn't seem to work properly in Google Chrome.

This is supposed to be a downwind race, with spinnakers hoisted in Table Bay and dropped off Guanabara Bay a few weeks later. I have raced in it four times and each time was very different from the others. Downwind conditions are not guaranteed. Storms along the way are almost a certainty, as evidenced by our capsize in the 2014 event. Hard racing, lots of fun and wonderful experiences that stay for a lifetime are a feature of this race, making close friendships that last for a lifetime. Close quarter living in such a small space brings out the best in people but it can also bring out the worst, so at the finish there will be a few people who will step off their boats and never want to see others in that crew again.
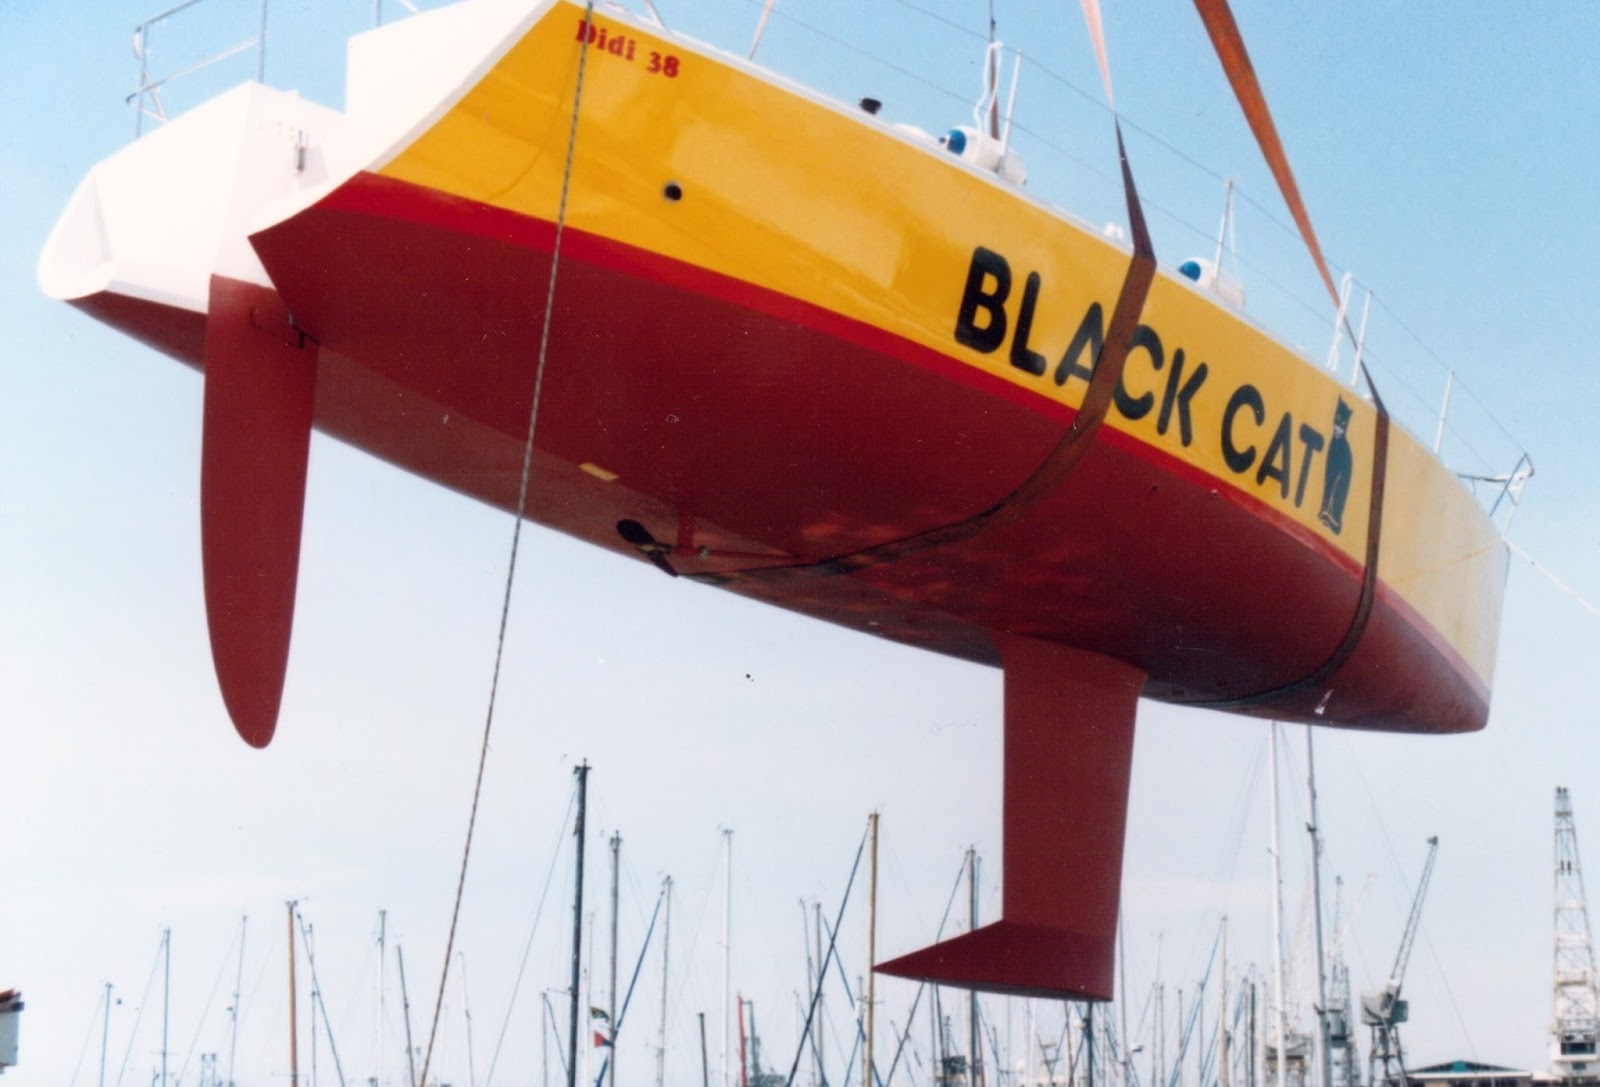
The launch of "Black Cat" 20 years ago.
I wish skipper Dave Immelman and his crew all the best for the race. I wish them great sailing, great results and, most of all, great friendships.

Friday, December 16, 2016

Argie 15 Framing

It has been pretty cold here the past few days, with winter starting to bite. Today the high temperature was just on freezing. As it grows colder over the next few weeks, a snug workshop is a good place to be spending productive time.

Kevin Agee is spending most evenings in his workshop, working on the Argie 15. Current tasks are fitting the framing for the seats and the transom doubler.

If you are fortunate enough to source timber longer than the hull, you can do the side stringers each in a single length. For the rest of us, it is necessary to join two pieces together to get the full length. This is done by scarphing (or scarfing or scarph-jointing) them. Each joint is done by cutting or planing the ends to be joined at an angle to form sloping mating surfaces. For an application like this and using modern adhesives, the slope angle need not be more than 1:6, so for timber 20mm thick the joint would be 120mm long.
One half of the scarph joint. This was cut on a saw but it could also be done with a jack plane.
The two pieces to be joined, dry-fitted to check accuracy.
The joint has been glued and here is shown being glued into the hull with temporary screws to hold the stringer until the glue has cured.
Stringers are glued in along both sides to form landings for the seats against the hull sides. Edge frames are also glued to the bulkheads to support the transverse seat edges.
Stringers fitted full length of both sides to form landings for the seats.
Edge framing being glued in for transverse seats.
Working neatly all the time will ensure a good finished product. This joint is an example, no scrappy edges, nicely filleted internal angle, all contact surfaces glued for a solid joint. 
View into the structure at the stern. The extra plywood layer on the centre of the transom is a doubler to strengthen it for the rudder pintle fittings. The notches in the tops of the transverse frames are for half-jointing the seat stiffeners. Those will be added in a future post.
You can see in all of these photos just how neat Kevin's work is. This is important if you are to have a really nice boat at the end of the project. If you don't think that you can't work to this standard, consider that Kevin is an amateur boatbuilder, not a professional. He is working with normal hobbyist woodworking tools. He has only built one previous boat, his own Inlet Runner 16.

To see more of our designs, go to our main website, our mobile website or our Flickr albums.

Monday, December 12, 2016

Plastics in Our Oceans

I read a very disturbing article in the monthly newsletter, "Talking Sailing",  of Richard Crockett, editor of Sailing for Southern Africa magazine. The article was authored by Lily Bovim, who has a BSc in Marine Biology and Oceanography and an Honours degree in Biology, both from UCT (University of Cape Town).
 
The invention of plastics has been one of the most wonderful and terrible things to happen to this planet. Currently, plastic pollution in the ocean is an enormous, increasing problem that we don’t really know how to fix. It is more than turtles confusing plastic bags for jellyfish, more than seabirds with six-pack rings around their necks and whales caught in lost fishing nets. Yes, litter is unsightly, but most people do not realise that the most dangerous plastic is that which we can hardly see.

When large pieces of plastic enter the ocean, via illegal dumping, accidental spills or swept off the land by wind and floods, it may take years and years to degrade. Some types of plastic wear down into small pieces when exposed to the sun’s UV rays and ground against other plastic. In this degradation process, they may release toxic chemicals into the ocean. For example, a common building block of plastics is BPA, which interferes with the functioning of animal hormones and has the potential to cause knock-on effects within a species and into an entire ecosystem.

Buoyant plastic provides an ideal, well-lit surface on which algae can grow, and scientists have only just figured out that this is an issue. For years we have been finding dead pelagic seabirds filled with rubbish – as if they had chosen to eat it! The reason is horrifically simple: this type of seabird relies on scent to forage, and algae produce a fishy smelling compound that attracts and confuses these wide-ranging birds into consuming plastic, leading them to die.

Microscopic pieces of plastic pose a more complicated threat. Microbeads from personal hygiene and cleaning products and plastic microfibers from some synthetic fabrics are too small to be filtered out of urban and industrial wastewater and end up in the sea. Recent studies have found that many filter- feeding species and life forms, such as zooplankton and fish larvae, cannot discern between their natural food and microplastic. Ingesting microplastic negatively affects their development and may lead to smaller population numbers of species with planktonic life forms. As plankton form the base of the oceanic food web, this means that most species that rely on the sea (including us) may end up eating plastic-filled animals or experience a dwindling food source.

As you may be realising, we are only just waking up to the extent to which plastic pollution is a problem. Hopefully, you now understand a bit more and will be more aware of every piece of unnecessary plastic that you come into contact with. Look for Polyethylene (PE), Polyethylene Terephthalate (PET), Polypropylene (PP), Polymethylmethacrylate (PMMA) and Nylon in face and body washes and avoid them!

Read more HERE

We need to spread this information and also take more responsibility for the plastics that we put out into nature everywhere, not only the oceans. Plastics are killing our planet, the only home that we have.

Sunday, December 11, 2016

Argie 15 Hull Glued together

The stitch-&-glue boatbuilding method is also known as stitch-&-tape. Our Argie 15 build being done by Kevin Agee has now reached that stage where both of these names can be seen in the process.

The hull skin has been stitched together with electrical ties, with a few copper wire ties at high-load points where the electrical ties are not strong enough to hold the panels close together. In the photo below, the bulkheads have been secured in their correct positions, changing the floppy panels into a hull shell of the proper shape. At this stage it is still somewhat flexible and can still be adjusted to remove any twist that may have occurred when tying the panels together. Get behind the boat and sight over the top of the transom, lining up the tops of the bulkheads with the top of the transom in your sight-line. Any twist will be obvious and must be pulled out before starting on the gluing process. You can see the ties holding the joints together.
The next step is to glue the outside joints of the panels between the ties. For this boat we are using MAS Epoxy products throughout and the glue that we are using is MAS Gluzilla in the 185ml cartridges, applied with a standard caulking gun. The glue comes out pre-mixed from the mixing nozzle and can be applied directly into the V-shaped joints between the panels, filling the joints flush between the ties. In the photo below the ties have been left in place to hold the joints until the epoxy has cured. Epoxy can stretch for days after it has hardened, so don't be in a rush to pull the ties out.

While the epoxy in the joints is curing you can glue the bulkheads in place. This is done with epoxy fillets, which we have chosen to also do with the MAS Gluzilla. It is applied in a large bead on each side along the perimeter of each bulkhead against the hull. They are finished smooth to a cove-shape using a tongue depressor or similar tool. In the photo below, there are two semi-circular cutouts in the bottom edge of the aft bulkhead of the middle seat. There is a matching pair in the forward bulkhead of that seat. These are to take PVC half-pipe drains that bring water from the forward compartment of the cockpit into the aft area where crew can bail it more easily or it can be drained through dinghy self-bailers.
 Next step is to pull out the ties and fibreglass the insides of the joints. The epoxy glue on the outside will hold the joint while the inside of the joint is taped. All of the seams must be taped, taking care to finish neatly against the bulkheads. When the epoxy has set and started to cure you can feather the edges with a small block plane with a very sharp blade set fine. If the epoxy has already cured then it may be better to feather the edges with a small finishing sander.
Close-up of taped seam before feathering the edges
Taped seams in the bow. The centreline seam has first been epoxy-filleted to form a good surface to receive the glass tape.
In areas where the taped seams won't be seen, like inside the seats, they don't have to be feathered but must be sanded smooth and the weave filled with epoxy to give a smooth surface. If you don't do this then there will be rough surfaces and jagged edges that will rip your knuckles when cleaning those places in the completed boat.

When that has all been done, lightly sand all of the internal surfaces of the boat and remove all dust, then apply three coats of low viscosity epoxy. The first coat will soak into the wood to create a good bond. By the third coat you should have a full coating of epoxy that can be sanded smooth to prepare for paint. Try not to leave more than 12 hours between epoxy coats, so that they can bond chemically to each other. If more than 12 hours has passed then lightly sand the epoxy before applying the next coat.
Three coats of epoxy on all inside surfaces.
To see more of this and our other designs, go to our main website, mobile website and Flickr photo albums.

Thursday, December 8, 2016

Didi 26 and Kidz At Sea Program

I have written before about the Kidz at Sea program in Sint Maarten. Guided by Garth Steyn, the program trains school children in the skills of boatbuilding then teaches them how to sail. They are using our Didi 26 design for this wonderful work, starting from CNC plywood hull/deck/bulkhead kits supplied by our CNC sub-contractor.

They launched the first boat, named "Purple Heart", last year and raced her in the Heineken Regatta as part of their program. Their sailing skills have benefitted from time spent on the water since the regatta and they recently had her doing 17 knots under spinnaker.
Garth Steyn speaking at the launching of "Purple Heart", with the woodworking teacher and his students.
Now boat #2 is progressing. Garth sent me photos today of the progress and the new boatbuilding class that is creating her. They plan to have her on the water and racing in the 2017 Heineken Regatta, with two Kidz at Sea crews competing boat-for-boat with each other.
Bulkheads and framing, ready for the hull skin.
Bottom panels being dry-fitted ahead of gluing.
Same stage, seen from the bow.
View of the radiused part of the hull framing. The third stringer from the top is where the junction will be with the side panel.
The students who are building boat #2, with their woodworking teacher.
This is a very worthwhile program and I am proud to be part of it. It is building new skills in a community that sorely needs them to expand their employment options.

To see more of this and our other designs, go to our main website, mobile website or Flickr photo albums.

Saturday, December 3, 2016

Pulling the Argie 15 Hull Together

Our new Argie 15 is coming along nicely. Kevin Agee is building it in his garage, shared with the Inlet Runner prototype that he built two years ago.

The hull has a bottom panel and two side panels each side. Assembly starts by joining the lower side panels to the bottom panel and to each other at the bow. This is a stitch-&-glue boat, so the panels are joined with plastic electrical ties threaded through paired holes.
The port lower side panel has been joined to the bottom panel. The ties are left a little loose at this stage, to allow fine-tuning when all panels are together.
Both lower side panels have been fitted and the port upper side panel is going on..
Bottom and sides all connected with electrical ties. The lines that are visible along the upper side panels mark where the stringer will be that supports the side seats. At this stage the hull panels are setting the shape of the hull. When the transom and bulkheads are installed they will reshape the hull to the intended shape. The grey patches on the panels are where the panels have been joined into single lengths with jigsaw joints.
Next step is to fit the transom. There may be a bit of excess length on the side panels, some projecting aft of others. Dry-fit the transom with the bottom edge aligned with the end of the bottom panel and the sides aligned for a "best fit" situation. You will need to press the transom down into the hull so that it presses the aft end of the bottom panel into a slight V-shape locally and the corners of the transom fit into the chines (joints between the panels). The hull panels are then marked along the outer face of the transom to show where they must be trimmed to fit flush with the transom.
Dry-fitting the transom into the hull panels, tied in place for marking the panels for trimming to an exact fit, if needed.
Next the transom is removed from the hull and the panels trimmed along the lines that were drawn. Then the transom is fitted back into position and permanently tied with electrical ties. Now is a good time to check the hull, to make sure that it is straight, not twisted out of shape, comparing the two sides of the hull by sighting over the top of the transom. If out-of-true it can be adjusted now, before tightening the ties.
Panels all tied together and tightened once the hull is straight. Some of these ties are copper wire, where it was found that a bit more tension was needed than electrical ties could provide without breaking.
Installing the bulkheads is next, in positions described in the building instructions.
Bulkheads (seat fronts) secured in position. The planks are temporary stiffeners to keep the plywood straight. 
Our Argie 15 is now starting to look like a nice boat. My next update will be bonding the various panels together permanently.

To see more of this and our other designs, visit our Flickr Albums, main website or mobile website.