Showing posts with label Amateur boatbuilding. Show all posts

Tuesday, September 22, 2020

Didi 40cr2 Kit at Exocetus Marine

 A few months ago I posted about the comprehensive kit being developed for the Didi 40cr2 by Exocetus Marine in UK. They are building a boat at the same time as developing the kit, to check everything for proper fit and assembly. Since my previous post the build has progressed to hull turn-over stage.

See captions under photos for explanations.

Side panel glued to hull framing.

First layer of pre-formed radius skin panels being installed.

This is how the radius skin panels are supplied in the kit, pre-formed in the Exocetus workshop.

Inside view of the radiused portion of the hull.

Second layer of radius fitted. A jigsaw joint on the side panel can also be seen.

Hardwood keel shoe, also cut by CNC. This forms a tough and flat surface onto which the keel root is bolted, removing compressive loads from the softer okoume plywood skin.

The gloss epoxy in this photo shows the fairness of the radius chine plywood hull. In the background is a Dix 470 catamaran that is also available as a kit, being built in the workshop.

High-build epoxy primer.

Outside, ready for hull-turning.

A novel way to turn a hull. I've not seen it done this way before.

The keel shoe is visible in this photo.

Steel frame on which the stern was supported during turn-over.

Turn-over completed.

The kit that Exocetus Marine is developing includes all plywood components plus all solid timber structure, pre-shaped and ready for installation. Their instruction manual is also very detailed, with interactive PDF 3D drawings that allow the builder to view in various formats and to zoom in to see finer detail.

To see our full design range, go to our main website or our mobile website.

Friday, May 24, 2019

Road Trip to Sail the Didi 29 Retro "Arabella"

It was my 70th birthday 2 weeks ago and I was surprised by my family with a totally unexpected visit by my sister Dorothy and her daughter Robynne from across the Atlantic, come to participate in the festivities and to help make it a very special occasion. Winding down Dorothy's trip, she and I made a brief road trip to North Carolina. We started off down the Outer banks, where I hoped to find some decent surf. The weather stymied that one with strong onshore winds, so we wasted little time feeling sand between our toes, visited the Graveyard of the Atlantic Museum in Hatteras and arrived at the ferry dock to board for Ocracoke to find rows and rows of cars waiting ahead of us.

Innocent us, we did not expect a flood of people to be visiting this tiny barrier island. I expected to arrive at the ferry dock and be boarded 15-30 minutes later, then a short crossing, time to get lunch on the tiny island before boarding our reserved ferry to Cedar Island. Wrong. After sitting in the queue for a long time, the very accommodating NC Ferry staff let us jump the line to catch the next ferry, or we were not going to make out 4pm ferry. That short crossing to Ocracoke is actually about 4 or 5 times the straight-line distance because the ferry has to wind back-and-forth through the channels.
Satellite view of Ocracoke Inlet, Courtesy Google Earth. The Hatteras ferry dock at extreme right, Ocracoke ferry dock at extreme left. The sand banks and channels move around and the ferries have to zig-zag through them. 
So, we had a drive-through tour that really didn't do justice to the very cute little town of Ocracoke, arriving in time to check in for our next ferry, without lunch. The ferry route to Cedar Island was more direct and parallel to the barrier islands, in deep water.The main entertainment was a variety of seabirds soaring behind us and looking for food to be churned up by the propellers or tossed in the air by passengers.

Once on land we saw the results of the coastal areas that were devastated by Hurricanes Florence and Michael last year. Homes destroyed, most that survived now being jacked up 6-8ft to get them above future flooding.Trees still on top of some homes, no longer habitable. And our hotel still undergoing reconstruction, with water service disrupted at times and cold water coming out of the hot taps. But the beds were new and very comfortable, so we got a good night's sleep. In the morning, a short ferry ride and drive to a marina in Oriental.

"Arabella" is very pretty. She was built by professional boatbuilder Bruce Mierke as his personal sailboat, to our Didi 29 Retro design. He customised his build to suit his own needs, so she has a shorter cabin and some different detailing.
"Arabella" in her dock, retractable bowsprit withdrawn
Lifting keel in raised position, hauled up by a tackle system led to the cabintop winch.
Lifting rudder in a casette. Bruce modified this from my original design, to give some steering when the rudder is partially raised. There is an outboard motor well but Bruce has an electric pod drive installed.
With the short cabin, Bruce has kept his halliards at the mast .
The bowsprit retracts and pivots on an inboard traveller on the foredeck, with control lines led aft to the cockpit.


"Arabella" hard on the wind.
Very neat high-peaked gaff rig with nicely-shaped mainsail. All spars are carbon.
So, how did she sail? Wind was very light, around 4-5 knots most of the time. On the flat water that we had, she sailed close to the wind at 3.5-4 knots, with little wake and an easy helm. She cut through the occasional powerboat wakes of the ICW with little fuss or loss of speed. Once cracked off, we pushed out the bowsprit, set the top-down roller-furled asymmetrical off the end and rolled away the jib to allow the spinnaker to breathe.

She powered up and reached at just a touch under the apparent wind speed, topping out at more than 8 knots boat speed in 9 knots of apparent wind. That put her boat speed at well above the true wind speed in which we were sailing. She did this with no fuss and very easy control. The speed gave the feeling that the wind had picked up but with the bag stowed and back on the wind under main and jib, we still had the same light breeze as before. She just gets up and goes. She will reel off the miles if used as a small cruiser.

"Arabella" has the smaller of the two gaff rigs that I drew. This one is suitable for most small crews, for racing or cruising. The other gaff rig is larger and will need a larger and more experienced crew. We also have a Marconi rig with square-top mainsail.

See our full range of designs on our main website or our mobile website.

Wednesday, May 15, 2019

27ft Sportfisherman

I may not have been paying enough attention when I started posting about the 26ft sportfisherman project of Kevin Agee. When we first discussed this proposed design it was to be about 26ft, so that was what I called it. But it grew a bit between first discussions and agreeing the final lines. It is actually a bit over 27ft from stem to transom, so it is now the 27ft sportfisherman project. And that project is now moving into the final finishing stages.

Having glassed the console, next we took a skillsaw to it. That was not to destroy it but to form a concealed switch panel with hinged cover to protect it from the elements.
Console after cutting to form the switch recess. The removed part will be used to form a hinged cover.
This is the infill piece that will fill in the hole in the console, with the switches mounted in the horizontal surface. We made this from 15lb Coosa Board.
The infill piece has been glued into the console. When finished it will hold the electrical switches, including the key-switch for ignition. 
Work has also started on fairing and priming the deck and rubrails to ready them for final painting.

After two coats of high-build epoxy applied by roller, the deck is ready for sprayed fairing compound.
Kevin took delivery of his new double-axle trailer, which had been set up by the supplier to suit the hull bottom. We jacked the boat with trolley jacks, supporting it on boat stands and axle stands, then dismantled the cradle from underneath. Pushing the trailer in under the boat was an interesting process, with trolley jack and axle stand playing leapfrog with trailer frame and axles.
New double axle trailer.
Jacked and supported on boat stands and trolley jack, the cradle was dismantled.
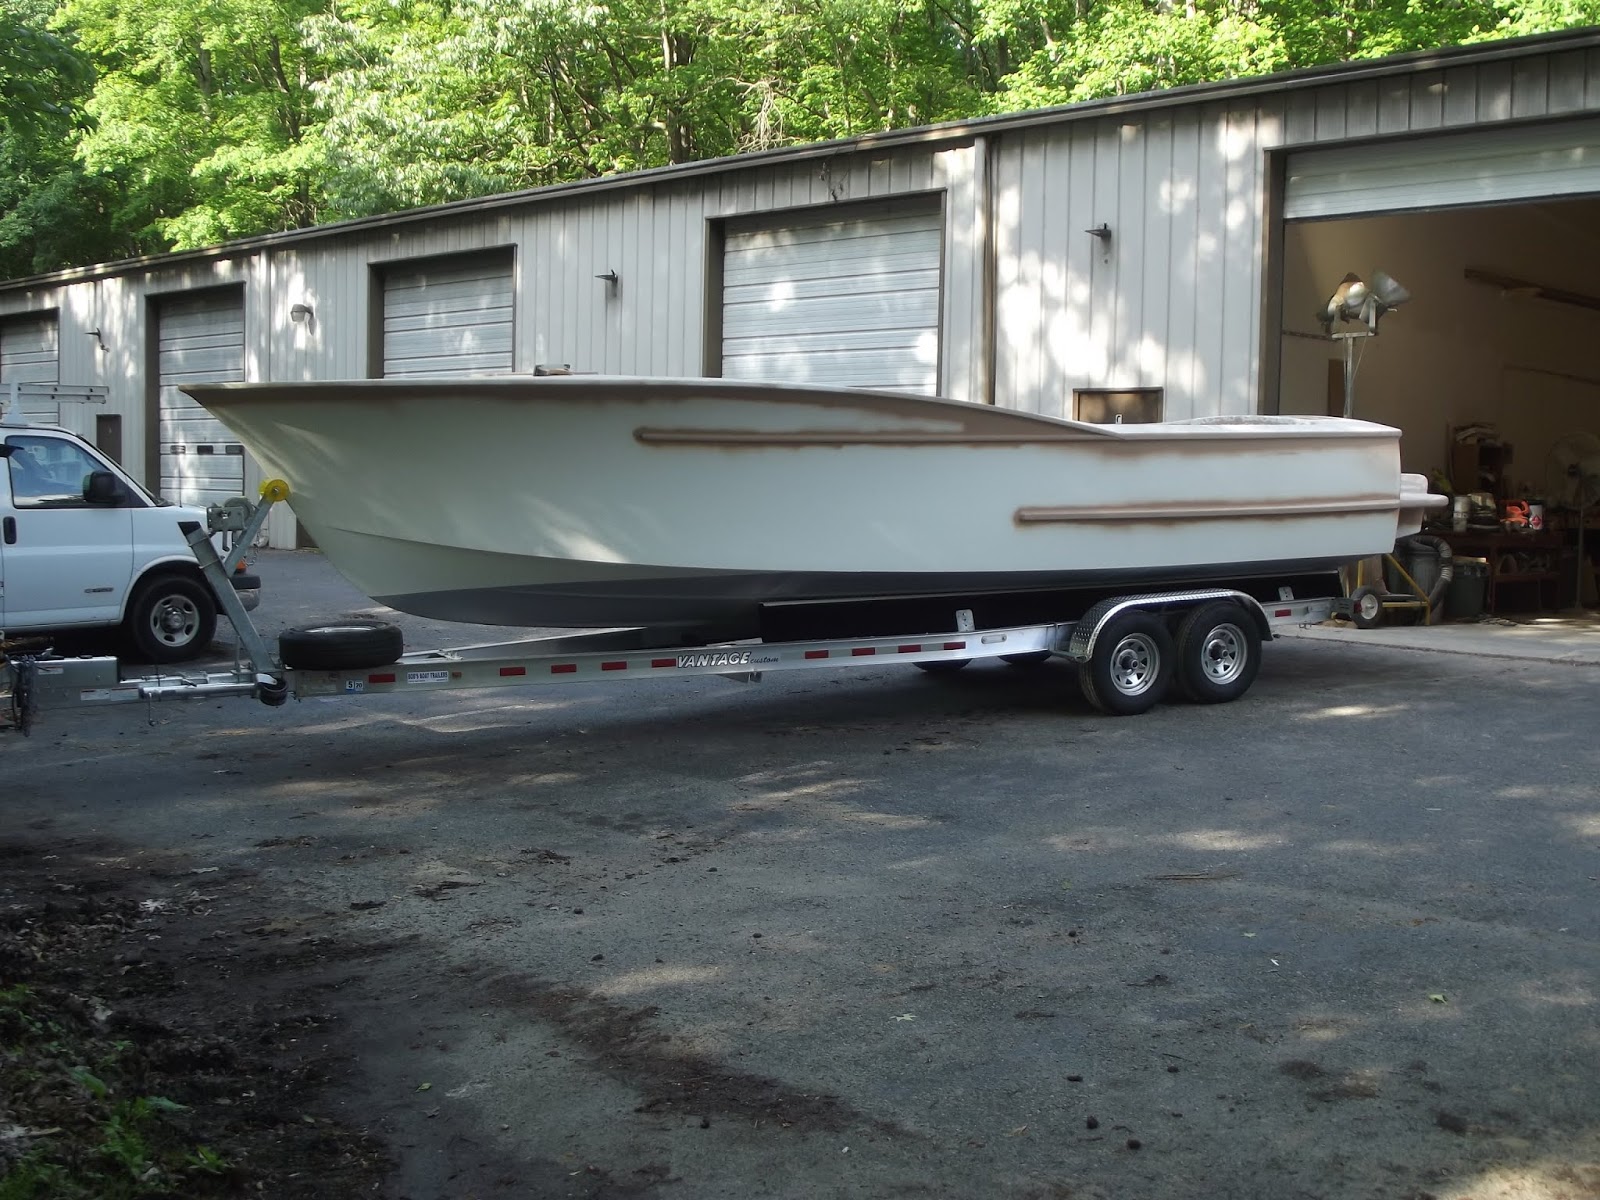
Safely on its trailer, the new boat came out of its shed for the first time.
Showing its lines in daylight.
For the first time we are able to step back and look at the transom and engine bracket.
Launch is still a few weeks away. Plans won't be available until after she is wet and has done some sea-trials. See our full range of designs on our website or mobile website.

Sunday, April 7, 2019

Back to Building a Sportfisherman

I had to take an enforced break from working with Kevin Agee on his 26ft sportfisherman for a couple of weekends, the result of a very minor injury that tried its best to become a much bigger issue. Now I am back to help him as he approaches completion of his new boat.

Work on the console and leaning post has continued.
Console structure completed, with Coosa Board for the instrument and helm surface, plywood elsewhere.
Front view of console. The opening will have a door for access to the instrument wiring and batteries.
Leaning post structure completed. Helm seat is on the left and an aft-facing seat on the right, with the live bait well under the aft seat. The hole in the side is for a tackle box and the other side will have a refuse bin.
Inside view of the live bait well. The rounded ends were made with laminated plywood half-pipe sections and allow the water to swirl or flow smoothly rather than splashing back and forth between hard corners.
Framing for cabin hatch.
Cabin hatch cover. It will be hinged at the front.
The tumblehome rail, dry-fitted to set up the alignment. This is two layers of high-density Coosa board, cut to a trapezoidal section and tapered toward the front. It will be glassed before fitting and will have a stainless steel capping.
The underside of the rubrail has been faired to a large radius against the hull in the bow and will now be glassed along with the decks. The glass will be lapped onto the hull, which has been ground back to glass for a good bond.
Today we glassed the console and leaning post with a layer of 8oz woven glass. 
The side decks aft of the sheer break and the aft deck have also been glassed, with a layer of 1708 stitched fabric. Doing the same to the side decks forward of the break and the foredeck is scheduled for the next week or two.

This design won't be on our website until after Kevin's boat is launched. See our range of other designs on our main website or our mobile website.

Monday, March 11, 2019

Sportfisherman Fish Box & Centre Console


After a period of laborious filling/sanding/fairing/sanding/fairing//sanding/painting, when it seems to the outside observer that nothing much seems to be going on, Kevin Agee's boat is back into a phase when progress appears to be going apace. Various projects are going on simultaneously. The foredeck has been glued on, the fish box lid has been formed, the rubrails have been glued on, the intermediate rails have been dry-fitted to fine-tune final position and the centre console is being assembled. See the captions under the photos for explanation.
Nicely faired and sprayed interior of the cuddy cabin. The foredeck has been glued on and is still to be filleted around the edges. The bright white interior will help with keeping this area clean and habitable. It will have a small seat each side and a WC between them.
The fish box lid has been made from multiple layers of Coosa Board, formed to the camber of the aft deck. The lid will be in two halves, hinged at the centre.
View of the underside of the lid. The white lines are epoxy filling the kerfs that were cut into the lower surface to help with bending to shape while gluing it over a former. The cover will be glassed top and bottom. The rebate around the perimeter allows it to lie flush in the aft deck.
In the foreground are the sides of the aft unit of the centre console, formed with plywood sides and laminated plywood radiused corners. This will form the seats and the live bait well. In the background are the sides of the forward unit, which will house the steering, engine controls and instrumentation.
Pre-formed corners of the console are laminated plywood to 15mm total thickness. The flat panels are 9mm plywood, so rebates have been cut 9mm deep and 20mm wide for gluing the flat panels to the corners.
Aft unit of centre console in position in the cockpit. This is the "leaning post" or seat unit. The forward side is the elevated helm seat, above storage. The aft side is the live bait well with an aft-facing seat over it.
The rubrails have been glued on and must still be shaped, then glassed along with the sidedecks. These are all Coosa Board, a lightweight board for the decks and a more dense board for the rubrails. The intermediate rail is oak and has been dry-fitted for fine-tuning for best aesthetics.
This design is not yet on our website. To see our full range of designs, go to our main website or our mobile website.

Thursday, February 14, 2019

26ft Sportfisherman Stern Detailing

Cockpit work continues on Kevin Agee's 26ft sportfisherman project. The photos tell the story.
Gluing in the cleats around the top of the fish box to support the lid. Many operations in boatbuilding demand hoards of clamps. This is one of them because the cleats must be bent into shape during fitting and held there until the glue cures. The cleats were glassed on exposed surfaces before fitting.
The cleats all done and the Coosa Board deck panel and fascia glued on.
In the corners of the transom, outboard of the fish box, are lockers. In this photo the opening for the door has been cut. The boxing on the left is the duct to take water through the locker to the transom drain. The ball valve is the drain for the fish box and will connect to the hole in the vertical face of the duct, to drain the fish box directly into the drain.
View of the fish box and lockers nearing completion. The doors are dry-fitted and will be installed after painting is completed.. The Coosa Board fascia has been glued on. The cockpit drains can be seen at each end of the toe recess.
The corners are rounded to soften the look of the cockpit and also for comfort when leaning against the decks while working fish. We accomplished this by cutting layers of Coosa Board to equal the height of the fascia. They will be glued in, then glassed over and faired along with the decks and fascias. This is the intersection of the side deck with the fish box.
Same detail at the intersection of the side deck with the foredeck. The foredeck will be fitted after completion of painting the cuddy cabin. The deck has already been glassed and painted, ready to be glued in place on the framing.
Deck stringers seen from below, showing how they are framed into the sheer clamp. These stringers are curly maple and have been precoated with epoxy and will be clear-finished with varnish. The underside of the deck is white-painted.
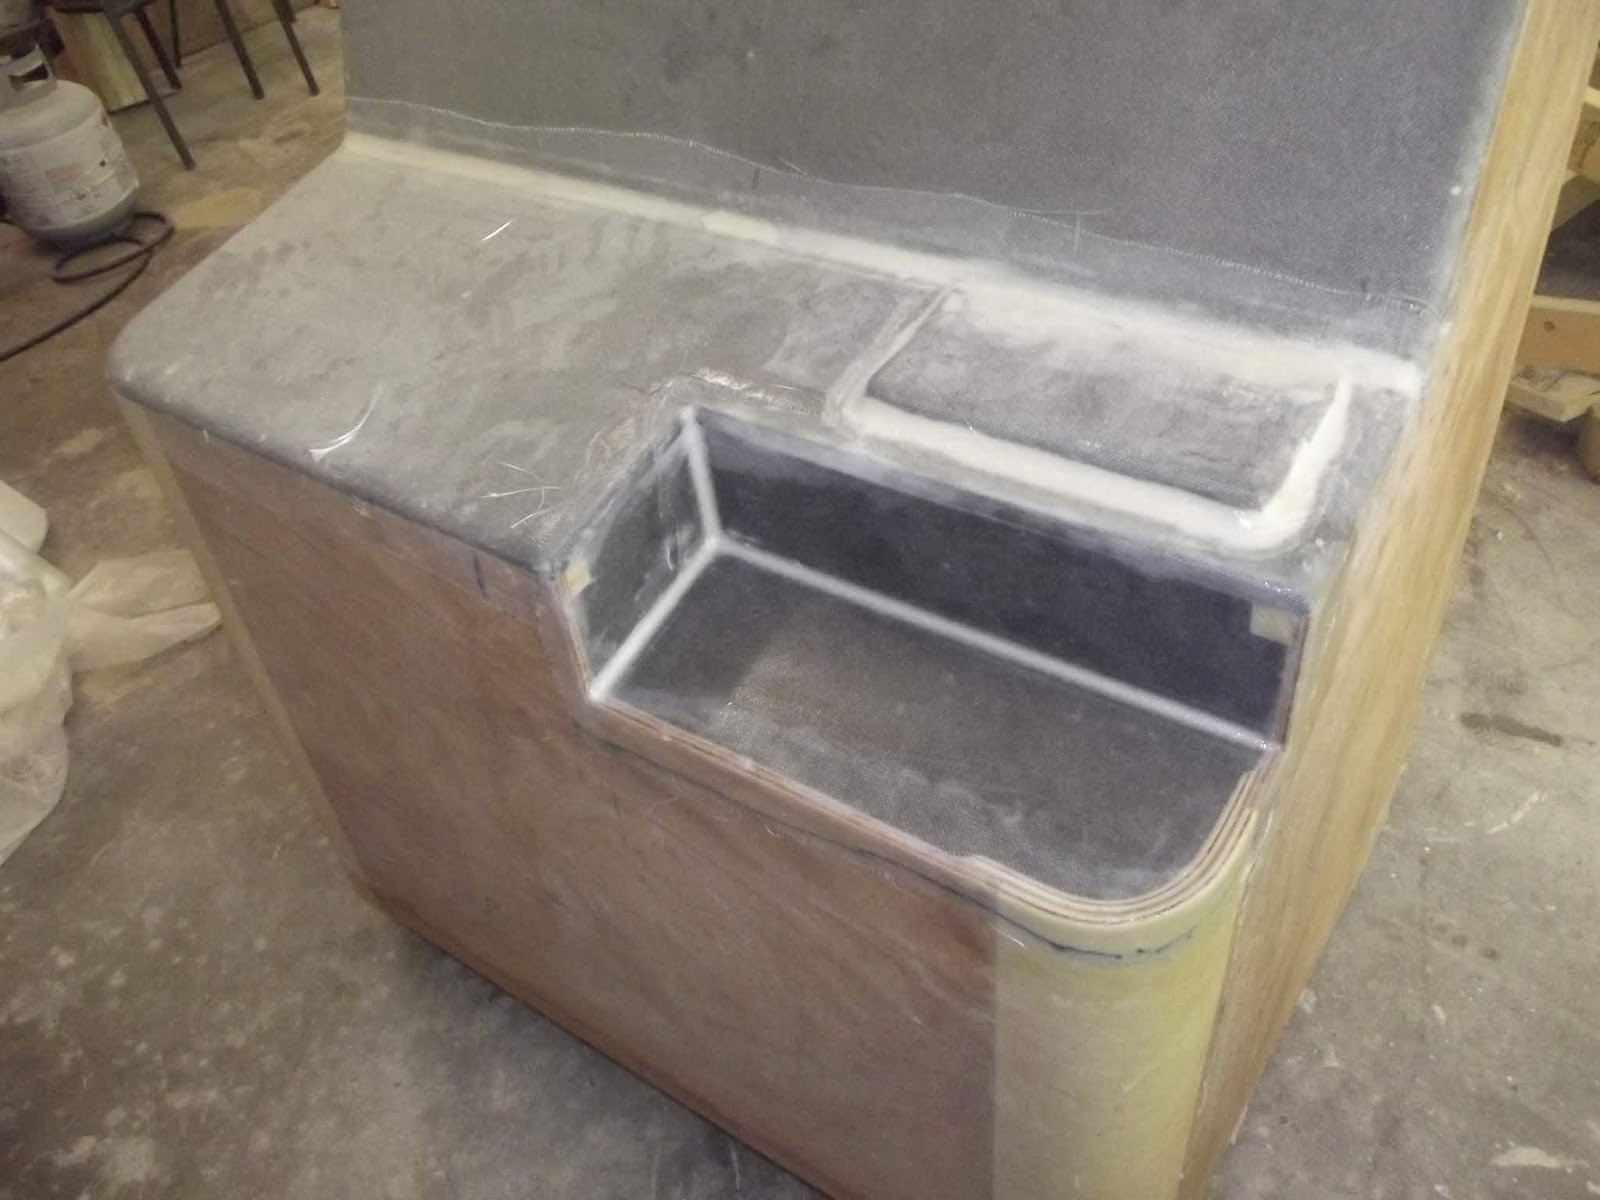
Also in the cuddy cabin, this box has been glued to the bulkhead to form a step. The opening takes a single drawer tackle box.
Work is about to start on constructing the centre console and leaning post. I am busy on that drawing and the cutting will start next week. A 200 litre live bait well is incorporated into the seat aft of the leaning post.

This design is not on our website yet but you can see our other designs on either our main website or our mobile website.