Showing posts with label amateur powerboat plans. Show all posts

Sunday, April 7, 2019

Back to Building a Sportfisherman

I had to take an enforced break from working with Kevin Agee on his 26ft sportfisherman for a couple of weekends, the result of a very minor injury that tried its best to become a much bigger issue. Now I am back to help him as he approaches completion of his new boat.

Work on the console and leaning post has continued.
Console structure completed, with Coosa Board for the instrument and helm surface, plywood elsewhere.
Front view of console. The opening will have a door for access to the instrument wiring and batteries.
Leaning post structure completed. Helm seat is on the left and an aft-facing seat on the right, with the live bait well under the aft seat. The hole in the side is for a tackle box and the other side will have a refuse bin.
Inside view of the live bait well. The rounded ends were made with laminated plywood half-pipe sections and allow the water to swirl or flow smoothly rather than splashing back and forth between hard corners.
Framing for cabin hatch.
Cabin hatch cover. It will be hinged at the front.
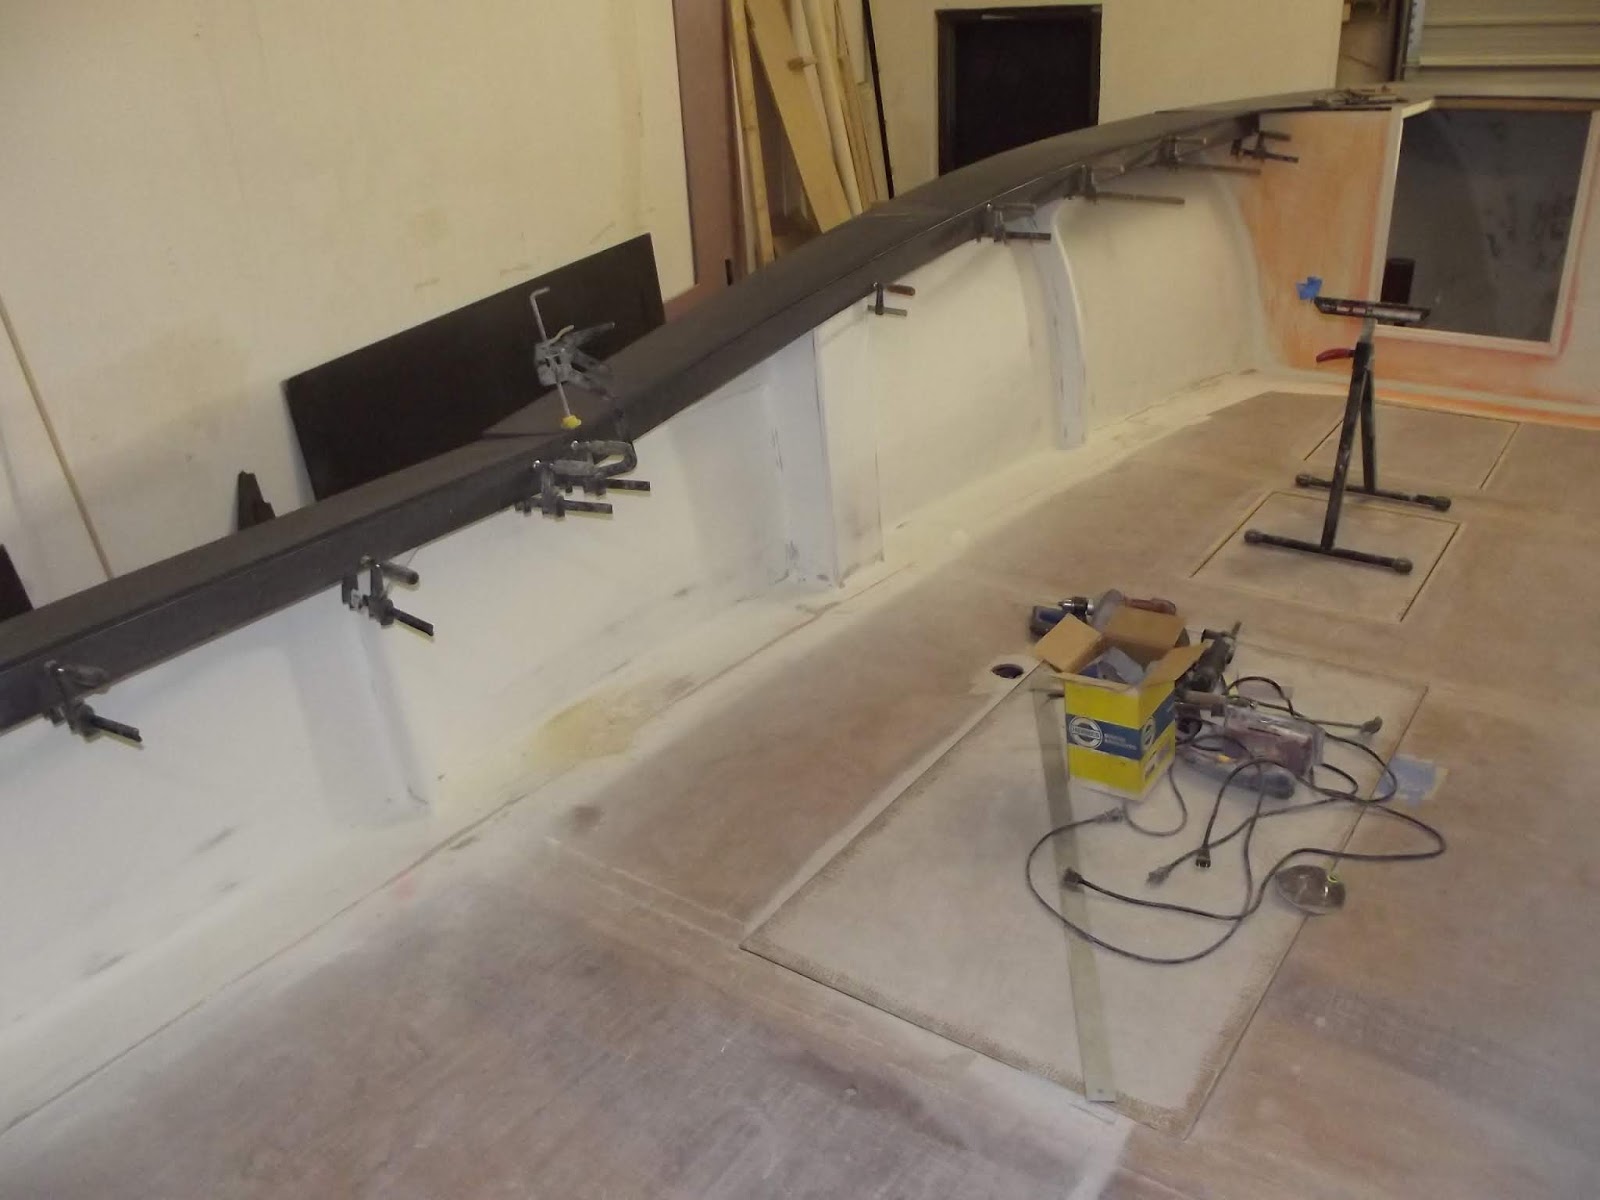
The tumblehome rail, dry-fitted to set up the alignment. This is two layers of high-density Coosa board, cut to a trapezoidal section and tapered toward the front. It will be glassed before fitting and will have a stainless steel capping.
The underside of the rubrail has been faired to a large radius against the hull in the bow and will now be glassed along with the decks. The glass will be lapped onto the hull, which has been ground back to glass for a good bond.
Today we glassed the console and leaning post with a layer of 8oz woven glass. 
The side decks aft of the sheer break and the aft deck have also been glassed, with a layer of 1708 stitched fabric. Doing the same to the side decks forward of the break and the foredeck is scheduled for the next week or two.

This design won't be on our website until after Kevin's boat is launched. See our range of other designs on our main website or our mobile website.

Monday, March 11, 2019

Sportfisherman Fish Box & Centre Console


After a period of laborious filling/sanding/fairing/sanding/fairing//sanding/painting, when it seems to the outside observer that nothing much seems to be going on, Kevin Agee's boat is back into a phase when progress appears to be going apace. Various projects are going on simultaneously. The foredeck has been glued on, the fish box lid has been formed, the rubrails have been glued on, the intermediate rails have been dry-fitted to fine-tune final position and the centre console is being assembled. See the captions under the photos for explanation.
Nicely faired and sprayed interior of the cuddy cabin. The foredeck has been glued on and is still to be filleted around the edges. The bright white interior will help with keeping this area clean and habitable. It will have a small seat each side and a WC between them.
The fish box lid has been made from multiple layers of Coosa Board, formed to the camber of the aft deck. The lid will be in two halves, hinged at the centre.
View of the underside of the lid. The white lines are epoxy filling the kerfs that were cut into the lower surface to help with bending to shape while gluing it over a former. The cover will be glassed top and bottom. The rebate around the perimeter allows it to lie flush in the aft deck.
In the foreground are the sides of the aft unit of the centre console, formed with plywood sides and laminated plywood radiused corners. This will form the seats and the live bait well. In the background are the sides of the forward unit, which will house the steering, engine controls and instrumentation.
Pre-formed corners of the console are laminated plywood to 15mm total thickness. The flat panels are 9mm plywood, so rebates have been cut 9mm deep and 20mm wide for gluing the flat panels to the corners.
Aft unit of centre console in position in the cockpit. This is the "leaning post" or seat unit. The forward side is the elevated helm seat, above storage. The aft side is the live bait well with an aft-facing seat over it.
The rubrails have been glued on and must still be shaped, then glassed along with the sidedecks. These are all Coosa Board, a lightweight board for the decks and a more dense board for the rubrails. The intermediate rail is oak and has been dry-fitted for fine-tuning for best aesthetics.
This design is not yet on our website. To see our full range of designs, go to our main website or our mobile website.

Thursday, February 14, 2019

26ft Sportfisherman Stern Detailing

Cockpit work continues on Kevin Agee's 26ft sportfisherman project. The photos tell the story.
Gluing in the cleats around the top of the fish box to support the lid. Many operations in boatbuilding demand hoards of clamps. This is one of them because the cleats must be bent into shape during fitting and held there until the glue cures. The cleats were glassed on exposed surfaces before fitting.
The cleats all done and the Coosa Board deck panel and fascia glued on.
In the corners of the transom, outboard of the fish box, are lockers. In this photo the opening for the door has been cut. The boxing on the left is the duct to take water through the locker to the transom drain. The ball valve is the drain for the fish box and will connect to the hole in the vertical face of the duct, to drain the fish box directly into the drain.
View of the fish box and lockers nearing completion. The doors are dry-fitted and will be installed after painting is completed.. The Coosa Board fascia has been glued on. The cockpit drains can be seen at each end of the toe recess.
The corners are rounded to soften the look of the cockpit and also for comfort when leaning against the decks while working fish. We accomplished this by cutting layers of Coosa Board to equal the height of the fascia. They will be glued in, then glassed over and faired along with the decks and fascias. This is the intersection of the side deck with the fish box.
Same detail at the intersection of the side deck with the foredeck. The foredeck will be fitted after completion of painting the cuddy cabin. The deck has already been glassed and painted, ready to be glued in place on the framing.
Deck stringers seen from below, showing how they are framed into the sheer clamp. These stringers are curly maple and have been precoated with epoxy and will be clear-finished with varnish. The underside of the deck is white-painted.
Also in the cuddy cabin, this box has been glued to the bulkhead to form a step. The opening takes a single drawer tackle box.
Work is about to start on constructing the centre console and leaning post. I am busy on that drawing and the cutting will start next week. A 200 litre live bait well is incorporated into the seat aft of the leaning post.

This design is not on our website yet but you can see our other designs on either our main website or our mobile website.

Sunday, January 27, 2019

26ft Sportfisherman Fish Box & Side Decks

The fish box of Kevin Agee's 26ft sportfisherman is progressing nicely. When planning this part of the boat the conflicting needs for efficient cockpit drainage, storage lockers, access to seacocks and maximising fish box capacity must be worked out and different solutions might be settled on for different boats. For Kevin's boat we have constructed the insulated fish box across most of the transom width, with a locker at each and and a toe-kick recess at the bottom.

The choices for the cockpit drains were going through the sides of the hull forward of the fish box, fitting drain pipes through to the transom or building ducts for the same purpose. We chose to build ducts as a good way to have large capacity drains while also being able to shape them to go around the access covers over the compartments below. This also allowed us to hide the drains under the wings of the outboard engine bracket on the outside and in the toe-kick recess of the lockers on the inside.
Basic fish box structure roughed in. The gaps at the ends of the toe-kick recess are for the drains.
Plywood components forming the ducts to feed water through to the transom drains.
Completed drain duct. The large hole will be covered by an access cover. The ball valve is for the fish box drain and will connect to a spigot into the duct.
Fish box constructed with plywood liner and foam slab insulation. Epoxy filleted at all corners.
The side decks were next on the build list. This started with fitting the light framing that defines the shapes of curves of the upper and lower edges of the side deck fascias. With these glued in and held to their required shapes by the side frames and gussets, the fascias were cut and fitted first, followed by the side decks. I was designing for this work to be done in marine plywood but this can be replaced by Coosa board. Kevin has chosen to do the decks in Coosa, fibreglassed both sides.
Cleats at top and bottom of the fascia define the shapes of fascia and deck. We added two gussets between frames, to shape the sheer break and to hold the cleats parallel to the sheer curve where it turns in aft due to the tumblehome.
At the sheer break the relatively straight aft cleats (glued in first) must be held firmly in their correct positions, so that the heavily curved forward cleats can be trimmed to come in at the correct angle and position, then glued. This is done with the gusset seen in the photo, which stays in place as permanent structure.
Coosa fascia and side deck dry-fitted to test for it. The fascias were cut as straight strips then flexed into place. The side decks were cut to the required shapes. All panels were then glassed on the back face before fitting.
The fascia is already glued on. The side decks have been glued, held in place by clamps along the inner edge and by screws with fender washes along the sheer.
Lots of clamps needed for this job. Screws with fender washers do the job on the outer edge where clamps cannot work. Kevin is cleaning up the excess glue on the underside of the deck. 
The foredeck has been cut to shape and is ready to be fitted. That will happen after painting of the cuddy cabin has been completed.

This design won't be on our website until close to launch time, so that any decisions taken during the build will be shown on the drawings that we sell. See our other designs on our main website or our mobile website.

Monday, December 24, 2018

Finishing Details in Sportfisherman Cockpit

Kevin Agee has has been working on bringing the surface finishes in the cockpit up to a high standard and is nearly ready for the prime coats that will receive the final finish coat. Lots of fairing and sanding involved, worth the effort in achieving a quality boat. The flush deck hatches have been completed, aside from routing as needed for the flush hinges and catches, then painting and fitting the compressible seals that will make them watertight.

Meanwhile I was busy at the aft end of the cockpit, cutting the scuppers to drain water from the cockpit. These openings fit very neatly between the top of the deck in the cockpit and the underside of the wings each side of the outboard motor bracket, at the outer corners of the transom. With that work completed, I have started on the base structure that will support the insulated fish box that will span most of the width of the cockpit against the transom.
Completed covers for the flush hatches in the cockpit sole. Those aren't handles in the middle of each cover, they are stiffeners to reduce flexing underfoot.
Final layer of high build epoxy on the hull, waiting to be sanded.
The orange colour is a guide coat of food colouring in solvent, applied by cloth. Sanding off this very thin coat high-lights any dents or holes that need filling because they remain orange in an otherwise white surface. The flush cockpit hatch covers are in position but not installed, to reduce our chances of falling into the openings.
Inside view of the start of the cockpit scuppers, cut with a 76mm (3") diameter holesaw.
Same stage, viewed from outside. The trim-tab actuator will fit between the scupper and the side of the outboard motor bracket.
Completed scupper, from inside.
Same stage, from outside. The scuppers fit in neatly below the wings of the outboard motor bracket and will be almost invisible from outside.
Roughing-in the base under the insulated fish box. The fish box will span the unpainted width of the transom, flanked by lockers with hinged doors for access to the valves below. The outer ends are open for water flow to the scuppers, which will be hidden in the toe-kick recess below the fish box.
By next weekend Kevin will have completed the sanding. I will finish roughing-in the fish box, then we will move on to the foredeck and sidedeck construction.

This boat won't go onto our website until this prototype is near to completion. Until then, see our other designs on our desktop website or our mobile website.

Sunday, December 9, 2018

Finishing the 26ft Sportfisherman Cockpit


My previous post about Kevin Agee's 26ft Sportfisherman project showed the support structure of the foredeck, dry-fitted for a test fit. Then the timber members were removed and set aside to be glued in later. This was to make it easier to finish the inside of the cuddy cabin, without drawing blood from our scalps.

Kevin is working toward a high-quality standard of finish, as good as he can manage as an amateur builder. Over all of the fibreglassed and sand-papered interior surfaces of the cockpit and cuddy cabin he has sprayed two coats of high-build epoxy, followed by two coats of fairing compound applied by roller. Most of this fairing layer has been sanded off and will be covered by sprayed high-build epoxy, then finishing coats.
Cuddy Cabin with the fairing layer being sanded. The white spots are the high-build epoxy layer showing through as an indication that the sanding has gone as far as needed to fair the surface with minimal thickness of fairing.
These are the curly maple foredeck stringers and fiddles for the cuddy cabin seats, epoxy-coated and waiting to be glued in then varnished.

Insides of hull sides with fairing layer sanded (light brown) and low spots filled (dark brown), ready for final sanding. The plywood cutouts for the hatch openings were loosely in place to keep us from falling through the openings. Now they have been removed for trimming to size, then addition of the perimeter framing. 
Parts for the flush cockpit hatches. The plywood cutouts have been trimmed to give 5mm (3/16") clearance all around. The perimeter frames have halved joints on the corners, cut on a table saw. The stiffeners have been cut to fit clear of the gutters into which these hatch covers will fit.
The cover on the left has the perimeter frame and stiffener in the positions where they will be glued. After gluing, the sharp edges will be rounded off and a drip groove will be cut into the lower face, all to be done with a router.
This design is not yet on our website, I want to get this prototype nearer to completion so that any adjustments that we make during the build can be incorporated into the final drawings before I make them available for sale.