Thursday, December 27, 2018

New Cape Henry 21 Launch in Australia

Ron Jesche in Adelaide, South Australia, has launched the newest build to our Cape Henry 21 design. Ron is a professional boatbuilder and owner of Stainless Boatworks. He produces high quality custom metal hardware for both power and sailing boats.

Ron bought the plans to build for his own use and has made a beautiful job of the build. He has enjoyed working with our well-detailed drawings so, part-way through the project, he took on the agency to sell our designs and plywood kits in Australia. He exhibited his nearly-complete boat at a local boat festival where it attracted considerable attention.

"Sealion" is finished in a very pretty blue, with cream decks. She was launched on Christmas Eve and went for her first sail on Christmas Day. Ron is delighted with the performance and good manners of his Christmas present to himself. His wife also enjoyed sailing on "Sealion" and feels safe on her, an important element of family boat enjoyment.

Ron's photos show what a great job he did of the build.
Nicely-detailed joinery for a pretty interior.
The work of a craftsman who is jusifiably proud of what he has produced.
Ron Jesche exhibiting "Sealion" at the boat festival.
Jon installed a small inboard diesel motor, tucked under the front of the cockpit.
Launch day, nearly ready to go sailing.
First sailing photos. Ron reported that she topped out at 5.8 knots in a 10 knot breeze.
Romping along under full cutter rig.
Ron's comments after sailing "Sealion"? What a great boat. Under 10 knots as we left and she sailed beautifully with jib and main, great steerage and control downwind in very light wind. As the wind picked up she accelerated beautifully. I am absolutely thrilled with this little boat, and can't wait to get out again tomorrow. I can't get over how well she sails. She heaves to very nicely also,and nicely mannered on all points of sail. 

Ron Jesche is well-qualified to represent us in Australia. He has general boatbuilding experience and also personal experience of building one of our most popular small cruisers, good qualities for advising potential builders about the build process and the quality of the designs that he represents. He can also supply kits for most of our plywood designs. Contact Ron via his website at Stainless Boatworks.

To date we have sold more than 100 sets of plans for the Cape Henry 21. To see our range of boat designs, go to our desktop website or our mobile website.

Monday, December 24, 2018

Finishing Details in Sportfisherman Cockpit

Kevin Agee has has been working on bringing the surface finishes in the cockpit up to a high standard and is nearly ready for the prime coats that will receive the final finish coat. Lots of fairing and sanding involved, worth the effort in achieving a quality boat. The flush deck hatches have been completed, aside from routing as needed for the flush hinges and catches, then painting and fitting the compressible seals that will make them watertight.

Meanwhile I was busy at the aft end of the cockpit, cutting the scuppers to drain water from the cockpit. These openings fit very neatly between the top of the deck in the cockpit and the underside of the wings each side of the outboard motor bracket, at the outer corners of the transom. With that work completed, I have started on the base structure that will support the insulated fish box that will span most of the width of the cockpit against the transom.
Completed covers for the flush hatches in the cockpit sole. Those aren't handles in the middle of each cover, they are stiffeners to reduce flexing underfoot.
Final layer of high build epoxy on the hull, waiting to be sanded.
The orange colour is a guide coat of food colouring in solvent, applied by cloth. Sanding off this very thin coat high-lights any dents or holes that need filling because they remain orange in an otherwise white surface. The flush cockpit hatch covers are in position but not installed, to reduce our chances of falling into the openings.
Inside view of the start of the cockpit scuppers, cut with a 76mm (3") diameter holesaw.
Same stage, viewed from outside. The trim-tab actuator will fit between the scupper and the side of the outboard motor bracket.
Completed scupper, from inside.
Same stage, from outside. The scuppers fit in neatly below the wings of the outboard motor bracket and will be almost invisible from outside.
Roughing-in the base under the insulated fish box. The fish box will span the unpainted width of the transom, flanked by lockers with hinged doors for access to the valves below. The outer ends are open for water flow to the scuppers, which will be hidden in the toe-kick recess below the fish box.
By next weekend Kevin will have completed the sanding. I will finish roughing-in the fish box, then we will move on to the foredeck and sidedeck construction.

This boat won't go onto our website until this prototype is near to completion. Until then, see our other designs on our desktop website or our mobile website.

Sunday, December 9, 2018

Finishing the 26ft Sportfisherman Cockpit


My previous post about Kevin Agee's 26ft Sportfisherman project showed the support structure of the foredeck, dry-fitted for a test fit. Then the timber members were removed and set aside to be glued in later. This was to make it easier to finish the inside of the cuddy cabin, without drawing blood from our scalps.

Kevin is working toward a high-quality standard of finish, as good as he can manage as an amateur builder. Over all of the fibreglassed and sand-papered interior surfaces of the cockpit and cuddy cabin he has sprayed two coats of high-build epoxy, followed by two coats of fairing compound applied by roller. Most of this fairing layer has been sanded off and will be covered by sprayed high-build epoxy, then finishing coats.
Cuddy Cabin with the fairing layer being sanded. The white spots are the high-build epoxy layer showing through as an indication that the sanding has gone as far as needed to fair the surface with minimal thickness of fairing.
These are the curly maple foredeck stringers and fiddles for the cuddy cabin seats, epoxy-coated and waiting to be glued in then varnished.

Insides of hull sides with fairing layer sanded (light brown) and low spots filled (dark brown), ready for final sanding. The plywood cutouts for the hatch openings were loosely in place to keep us from falling through the openings. Now they have been removed for trimming to size, then addition of the perimeter framing. 
Parts for the flush cockpit hatches. The plywood cutouts have been trimmed to give 5mm (3/16") clearance all around. The perimeter frames have halved joints on the corners, cut on a table saw. The stiffeners have been cut to fit clear of the gutters into which these hatch covers will fit.
The cover on the left has the perimeter frame and stiffener in the positions where they will be glued. After gluing, the sharp edges will be rounded off and a drip groove will be cut into the lower face, all to be done with a router.
This design is not yet on our website, I want to get this prototype nearer to completion so that any adjustments that we make during the build can be incorporated into the final drawings before I make them available for sale.

Thursday, November 22, 2018

Cuddy Cabin of Sportfisherman.

The cockpit deck of Kevin Agee's 26ft sportfisherman project is in and the insides of the hull sides have been glassed, soon to be faired ready for painting. The deck of the outboard engine bracket has been completed as well. I detailed the deck extensions of the bracket for wood construction but Kevin chose to do these with a Coosa board core between plywood top and bottom skins. The entire structure was glassed inside and out for longevity.
Outboard engine bracket structure has been completed and glassed. Glassing of the
transom is about to be done. The holes in the deck are for access to steering and
control cables and hoses.
Kevin was also working on hull framing, where I modified them to reduce the projection into the cockpit and increased their thickness to maintain strength. The only frame unchanged was at the boxings for the fuel filler pipes, which has to be large enough to contain pipes, vents and fittings.
Boxing for fuel filler being glued up. The next frame forward has been trimmed
and doublers added both sides, then glassed.
Boxing completed and glassed, ready to be trimmed flush with the sheer.
In the meantime I have been working on the cuddy cabin, fitting out the interior and preparing the deck framing.
Cuddy cabin sole dry-fitted, along with the pedestal for the toilet and the two
small shelf seats.
Kevin glued in the plywood soles and seats during the week before my next visit.
He epoxied bolts into the plywood to serve as studs to fasten down the toilet 
My next task has been framing the foredeck to get it ready for the plywood deck. Kevin has chosen to use curly maple for the deck stringers, which will be clear finished against the white-painted deck. The stringers run through the forward bulkhead and butt up against the aft bulkhead of the cuddy cabin, bonded to the bulkhead and cleat. The forward ends of the stringers are notched into the sheer clamp, which involves some careful setting out for cutting the slots and cutting the slots with a tenon saw and chisel.
Cutting a notch in the sheer clamp for a stringer. The length of wood is a straight-edge
to guide the angles of the saw. The back face of the notch is cut at about 45 degrees to
minimise the amount of sheer clamp that is cut away in the process.

Completed notches for deck stringers, through bulkheads and into sheer clamps.
Deck stringers and hatch trimmers dry-fitted and ready for gluing.
Deck stringers are notched into sheer clamps and bulkheads. They will be glued in
after the hull skin inside the cuddy cabin has been faired and sanded.
This build will be completed during the winter and launch is being planned for the spring.

This design is not yet on our website and will appear there closer to completion of Kevin's boat. To see our range of designs, go to our desktop website or our mobile website.

Tuesday, November 20, 2018

For Sale - Dix 43HD Aluminium World Cruiser

"Tana Vika" is a well-loved and proven serious cruising sailboat, custom-built from aluminium for a British couple who have cruised her extensively since launch. You won't find her name in any dictionary that translates foreign languages; they named her for two of their favourite places in the world, visited in countries very far apart while doing a back-pack circumnavigation in much younger days.

Designed and built as a go-anywhere cruiser, "Tana Vika" is the prototype of our Dix 43 HD design. She was professionally built in Czech Republic and launched in 2008, then motor-cruised through the rivers and canals of Europe to UK, where she received her rig.
"Tana Vika" sailing off Newfoundland.
Since then "Tana Vika" has cruised double-handed through the North Atlantic, Caribbean, Pacific and Northern Indian Ocean as part of her intended circumnavigation. Failing health has caused the owners to cut short their sailing before completing the circle and to put their boat on the market. She is currently in Langkawi, Malaysia.
Cruising route of "Tana Vika".
"Tana Vika" is a comfortable floating home that can take you to the Arctic or Antarctic, if tropical cruising is not your thing. She is equipped to take on the oceans of the world, and has sailed through three Force 9 gales and one Force 10 storm during her travels. The Force 10 was while crossing the Gulf Stream en-route from Chesapeake Bay to Bermuda and did considerable damage to other boats nearby, while "Tana Vika" came through unscathed.
"Tana Vika" layout. Click to enlarge.
Looking forward from companionway.
Galley, from saloon. Secure hinged aluminium companion door.
Nav station.
Heads.
Shower with folding seat & wet locker door.
Deck view.
Cockpit and dodger, with secure hinged companion door.
Cockpit with folding table.
Modern underbody with fin keel and spade rudder.
I will not list her equipment here. She is well equipped for the voyaging that she has been doing and ready to continue for her new owner. Her rig was serviced in Australia, including replacement of her standing rigging.

She is listed on my brokerage pages, asking price US$225,000. Please send me an email if you are interested in her and want more information.

Wednesday, November 7, 2018

Didi 40cr Opportunity in New Zealand

The Didi 40cr is a variation of our Didi 38 design, of which my "Black Cat" was the prototype. We launched "Black Cat" in November 1995; she will be 23 years old in a few days and has crossed the South Atlantic 6 times. There are more then 80 sisters sailing or in build around the world.

A builder in Whangarei, New Zealand, has built his Didi 40cr hull to a good standard but is not able to carry on with it. He is relocating to UK and cannot take the boat with him. His project is available at no cost to another builder who would like to own and sail a fast cruiser/racer like this.

The hull structure is mostly completed, so will give a builder a head-start of 1000 or more hours in saved building time.
Most of hull structure completed.
Neatly executed woodwork.
The hull is still upside-down on its building stocks, mounted on a road trailer and protected from the weather by a tarp. The trailer is available to move the hull but must be returned to its owner.
Hull on building stocks, mounted on road trailer.
For more information on this opportunity, go to the listing at
https://www.trademe.co.nz/Browse/Listing.aspx?id=1812843342, from where you can contact the owner directly.

Monday, November 5, 2018

Bigger Sister to Oppikat Catamaran

Following on my last post, about the new build options for the Oppikat, a customer has commissioned a bigger sister. Over the years many people have asked if we had a bigger cat for them to build. They wanted a boat that could be sailed by two adults rather than by children or by one adult with a small child. So, now we have the Bigakat 12. The first boat will be built in Nassau, Bahamas, from plans and patterns. The drawings have been completed and are already on their way to the amateur builder.

The 
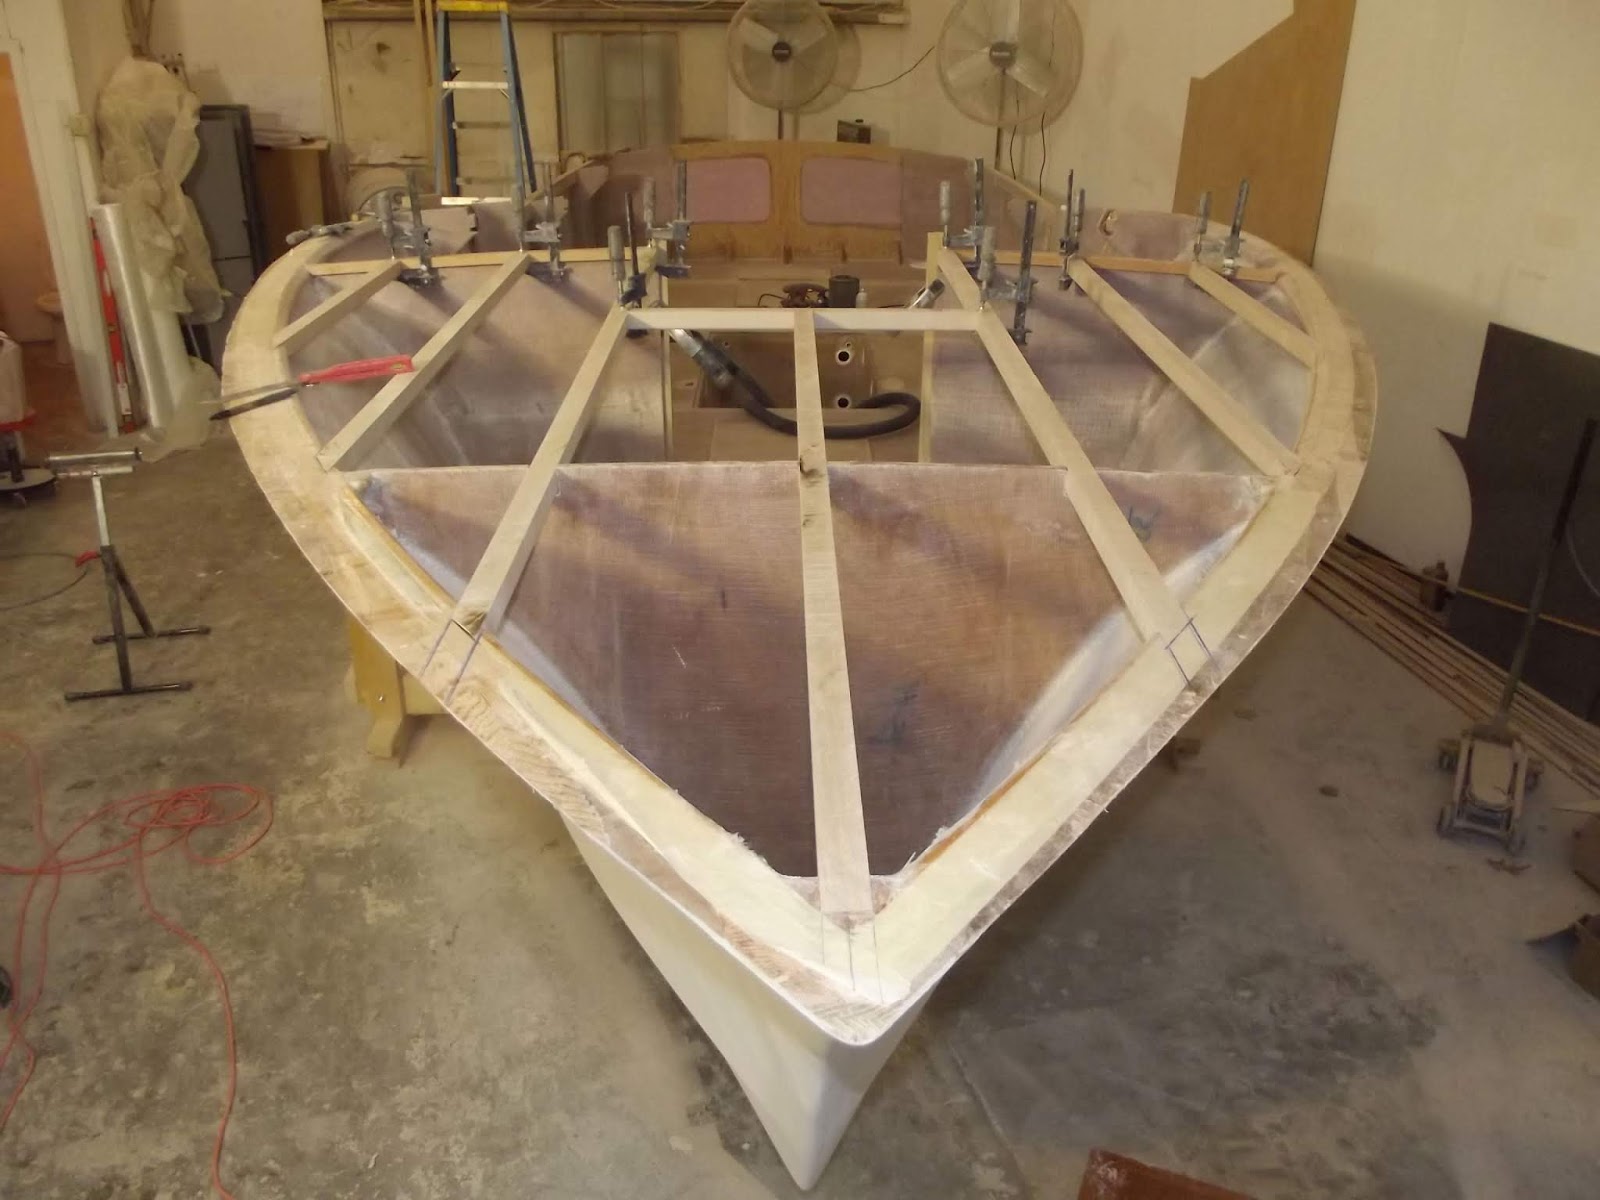
Bigakat 12 is in every respect a bigger sister to the Oppikat. The build methods are the same, with plywood upper hull panels and strip cedar below, over plywood bulkheads. Only the size and proportions have changed and some minor details.

While working on this project I took the extra time to add more drawings to the set than we have in the Oppikat design. The additional detailing helps builders to better understand the construction details and process of assembly. Better understanding improves confidence and building speed.
Biggakat 12 sail plan.


Specifications of the Bigakat 12 are:-

LOA - 3.72m (12'2")
LWL - 3.72m (12'2")
Beam - 2.10m (6'10")
Draft - 0.27m (10.5")
Mainsail - 7.83sq.m (84sq.ft)
Jib - 2.5sq.m (27sq.ft)

The standard plan package for the Bigakat 12 includes full-size patterns for all bulkheads, printed overlaid on top of each other. As an optional extra we can also supply full-size patterns on paper for the bulkheads each set out separately, along with patterns for the plywood panels of hull and deck. This allows the builder to cut out the bulkhead shapes to paste them onto plywood for cutting.

We also have detailing to build the Bigakat 12 in fibreglass, laminated in female moulds. This version is primarily for pro boatbuilders to build in series. We don't currently have any GRP builders producing the Oppikat and Bigakat 12 but would be interested in discussing this with any pro boatbuilder who is interested.

Plans for this design and all of our other designs can be ordered from our desktop pricelist or our mobile pricelist.

To see all of our designs, go to our desktop website or our mobile website.


Thursday, October 25, 2018

Oppikat Junior Catamaran News

There is a lot of interest in our junior catamaran design, the 9ft Oppikat. It is built from a combination of cedar strip for the compound curved surfaces and plywood for bulkheads and flat surfaces. Some amateur builders have produced exquisite examples, showing beautiful craftsmanship that highlights their skills.
This Oppikat was built by Pavel Arzhevitin to a gorgeous standard.
We all have our own ideas about finishes, hardware layouts etc. so what one builder does to suit their own intentions for their boat will be different from another. That is part of the attraction of amateur boatbuilding, producing one-off craft that exactly suit our own needs.

The Oppikat was intended essentially as a boat for junior sailors, to have a boat of their own that has a good turn of speed and can give exciting sailing before moving up to bigger and more challenging boats. But time has shown that these little boats aren't only sailed by their intended lightweight skippers. The Oppikat has high-volume hulls for safety and fathers have sailed them, both by themselves and with junior.
Oppikat built by Frank Nagel, with his son sailing.
Oppikat can be built from plans only, which include full-size patterns of bulkheads and transom. Now we have added another two build options.

1) Build from plans and pre-cut bulkheads, cut by CNC router.

2) Build from plans and a wood parts kit that includes all plywood components, pre-cut by CNC router, plus bead and cove strips for the lower parts of the hulls and timber for all of the framing in the hulls.

These are available in USA but may be expanded to suppliers in other countries if requested. For USA buyers, go to our plywood kits pages for either computer or mobile devices.

I have also been asked numerous times over the years to draw a slightly bigger sister that can carry an adult or two. That is now on the drawing board and should be available in a week or two. Watch this blog for future news.

To see our full range of designs, go to our main website or our mobile website.

Tuesday, October 23, 2018

South Atlantic Capsize e-Book

Ever since I published the paperback version of my book, "SOUTH ATLANTIC CAPSIZE - Lessons Taught by a Big Ocean Wave", readers have asked for a digital version to read on their computers or e-readers. I have finally got around to doing that. We can now offer this book as a PDF file to view on a computer or EPUB to view on readers that use that format.
Cover image.
I have included an extra chapter, in the form of an article that I wrote for the magazine of National Sea Rescue Institute of South Africa, at the request of the CEO of that organisation, Dr Cleeve Robertson. He was concerned about how many people were perishing in boat capsizes around the coast of South Africa and elsewhere. It details the many dangers that impede anyone trapped in or under an upturned boat and advises on those dangers and what route and steps to take for the best chance of surviving the deadly situation. We will also include a copy of the article with future sales of the paperback version of the book.

To buy a paper or digital copy of this book, go to the Published Books page on our main website or our mobile website.

Sunday, October 7, 2018

Sportfisherman Cockpit

Kevin has completed the ducts under the cockpit sole and installed tanks, pipes, pumps, seacocks and control valves that are most easily done with plenty of access available. More buoyancy foam was added in the compartments that are to be sealed.
Ducts completed, tanks, pumps, pipes & fittings installed and foam flotation poured
Holding tank on the left, water tank on the right, strapped down. Between them is the diverter valve for the holding tank. The tanks can be removed through the hatch opening when needed.
Cockpit deck panels waiting to be installed. The curved one shows the underside of the aft panel in front of the curved transom. These aft compartments are all accessible through hatches or access covers, so they are fully painted for easy cleaning and to make it easier to see into them in bad light. The two small fittings close to the centre of this panel are LED light fittings to light the compartment when needed at night. The deck panels were all pre-glassed, top and bottom. prior to marking for paint.
Cockpit sole glued in. Joints between sheets and around perimeter will be filled and glassed over.
Looking aft from the cuddy cabin. With the deck sheets now fitted, the tops of the gutter frames are flush with the deck surface.
Work now going on is sanding the hull sides to fair them prior to glassing, which should be starting by next weekend.

This design is not yet on our website. To see our range of designs, go to our main website or our mobile website.